Tuesday 28 July 2015

DIY Notebooks


This is a little project that the kids can help with. The notebooks are made from cardboard from a cereal box and printer paper. You can decorate them any way you like but we decided to do a minion and comic book theme.

Materials

For the notebooks you will need:
Cereal box
Printer paper (or any plain paper)
Needle and thread
Ruler
Pencil
4 pegs or clips (not essential but helpful)

To decorate the minion notebook you will need:
Yellow paint or yellow card
Blue card
Grey card
White paper
Coloured markers
2 buttons
PVA glue

To decorate the comic notebook you will need:
Red paint or red card
Images cut from a comic book or magazine
PVA glue


To start with, open out the cereal box and cut a rectangle about 1cm bigger than the paper you are using. I used A4 printer paper. If you're box isn't big enough, trim the paper so the cardboard is bigger than the paper.

Next, take your paper and fold each sheet in half. I used 15 sheets because my paper is quite thick. If you are using thin paper, you can add more but bear in mind that you will have to put a needle and thread through it and the thicker it is, the tougher it will be.


Measure the cardboard and mark the halfway point. 

Using a ruler and the handle of a spoon, score down the middle. This will make it easier to fold the cardboard. Place all the paper on the cardboard cover. Make sure the fold lines match then mark dots an inch apart from the top of the paper (not the card) down to the bottom.


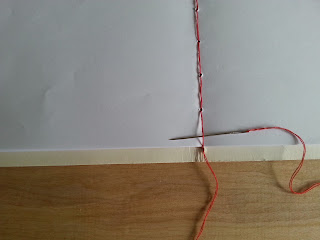
Place pegs or clips on each side to hold it all together. I found it easier to pierce the paper and cardboard with the needle before I began sewing. I did a few sheets at a time until the needle made it through all the layers.  Thread your needle, match up the ends of the thread and tie a knot.


Pierce a hole in the cardboard at the top of the paper and put the needle through from the back to the front so your knot will be on the back. Now go to the first hole, sew through and bring the needle back through the next hole. Continue all the way down.


Once you get to the bottom, bring the needle through a hole at the bottom of the paper then work upwards to fill in the spaces.


When you get back to the top, turn the book towards you so that the loose thread is at the bottom. Take the needle through the last loop then push the needle to the back.


Tie the threads together at the back making sure they are secure.  You now have a notebook, well done!

You can leave it as it is or start decorating.


Minion


Paint the outside or cover with yellow card. Cut out the dungarees, pocket and straps from blue card and glue in place. Add detail along the edges with pencil. Glue the buttons in place. Cut out 2 grey circles and 2 white circles (slightly smaller than the grey). Glue them together. Using a brown marker, draw the centre of the eyes. Add a small black circle for the pupil. Finally add a dot of white paint. Draw on the edge of the goggles, mouth and hair with a black marker.


Comic book


Paint the cover red or cover it with red card. Cut out pictures from comic books or magazines. Glue the pictures onto the cover overlapping them to cover most of the page.


Small Minion Notebook


For this notebook, I cut a small piece of card and cut the paper to match. I punched 3 holes in the top and used jewellery wire to make the rings. You could use string or ribbon instead, just leave enough room to open the pages, don't tie it too tight. This was much quicker to make than the other notebooks.


Don't forget, I'd love to see what you manage to create. You can post photos on my Angela Catherine Crafts Facebook page.

Good luck and happy crafting!


Wednesday 22 July 2015

Sofa and Sideboard Re-vamp

 We are currently in the middle of extending and renovating our house. It has been a long, slow process and we still have a long, long way to go. I've had to come up with cheap ways to furnish the new space. I thought I'd share some of them with you to give you all some inspiration (even if it's not to your taste, you'll get the idea!)


SOFA MAKE-OVER

We picked up an Ikea sofa in the clearance section for £50. It didn't have a cover but I wanted to cover it with my own fabric anyway. I bought 5 metres of heavyweight velvet for the sofa and 1 metre for the cushions from The Cotton Print Factory in Glasgow. The fabric cost around £45. Now, I should have made a pattern for the sofa before I started but I was too eager to get the fabric on so I winged it! I made a load of mistakes and had to hand stitch lots of it but I'm quite happy with how it turned out. I machine stitched the back panel and base then I loosely cut fabric to the shape of the arms and machine stitched that at the bottom. I then stapled the fabric to the underside and began cutting and hand stitching the rest. It took hours and hours and I had to stop numerous times because my fingers were raw and sore. After a couple of hours each night for about a week, I finished it - yay!


 BEFORE


 AFTER


SIDEBOARD MAKE-OVER


We have had this sideboard for about 10 years. It has lasted well but with two boys in the house, it has been bumped and scratched. Also, it doesn't quite fit with the new colour scheme so I decided to paint it. I took off all the handles and gave them a spray with chrome effect spray paint. I got my husband to take it all apart so I could paint all the parts. I used a light grey on the parts that are inset and white on the rest. As I wanted this to be a cheap project, I used paint that I already had in the house so it didn't cost anything. I was pleased with how it turned out and it now fills part of the new space in the kitchen.


BEFORE

AFTER


Monday 20 July 2015

Folded Book Wall Hanging Letter Holder


Today I am going to share a tutorial on how to make a wall hanging letter holder from an old, unloved book. This is my first attempt at blogging so please bear with me!

Firstly, I wouldn't recommend using good books. Books that have pages missing, a broken spine or generally look tatty are ideal. Really anything that would be heading for the recycling centre would be best, that way you can transform something unwanted into a usable item. If the thought of using a book makes you cringe, an old phone book, catalogue etc would work too, the overall look will be different depending on the size and colour of the pages.


Materials needed:

Paperback book
Glue (Tacky glue or a hot glue gun)
Ribbon or twine
Glitter
Beads from old or broken jewellery


Ok, so let's get started. First, take your book and remove 5 pages from the front and 5 from the back. You will need these later for the flowers.


Start at the front of the book and turn it towards you. Fold the first page in half towards the spine.


For the second page, fold the corners in towards the middle so that they meet - creating a point - then score the folds.


This creates the pattern for the diamond effect. Continue folding 1 page in half, the next with the corners folded towards the middle until you have folded all pages.


It will get more difficult to fold as you go on because the pages will fill out.  Once you have all the pages folded, cut the cover leaving about 2" on the front and 2" on the back.


Take a piece of ribbon or twine and using a hot glue gun, glue one of the ends to the front and one to the back in-between the cover and the first/last page. Make sure the ribbon/twine is secure enough to hold the book.


Now for the flowers:

Take one of the pages that you took out of the book at the beginning. Fold the bottom right corner up towards the left edge creating a triangle. 


Cut the remaining piece off leaving the folded triangle.


Turn the triangle so that the long folded edge is at the bottom. Take each corner and fold towards the top point.


Take the right side and open out so that the crease lies along the bottom edge.


Do the same on the other side.


Fold the corner down so that the crease lies along the edge.


Fold back towards the middle.


Do the same on the other side then pinch and glue the inner parts together. This makes one petal. You will need 5 for each flower.


Once you have 5 petals made, glue the edge of each petal and stick together. If you are using tacky glue, use a peg to hold them together while they dry.


Once the 5 petals are stuck together, start on the next flower.

Decide what bead or button you would like to use for the centre and hot glue it in.


Brush the edges of the flower with glue and dip in glitter. You now have 2 flowers ready to be hot glued to your letter holder.


Glue the flowers where you want them. Voila! You now have a hanging letter holder. 


I would love to see what you all come up with. You can upload your creations on my Angela Catherine Crafts Facebook page. Good luck and most importantly, have fun crafting!